I was going to make a simple list of photography stuff I wanted to do - just for myself, to have something to motivate me and work towards. However, as this is essay time which means I will do anything but what I am supposed to, I wrote this. I'd love to hear other suggestions in the comments. The list isn't meant to be exhaustive: this is stuff that
I want to do, rather than think that everyone should do. This list isn't in any order at all, it's completely random. The headings are probably a bit iff too, I just wanted to break up all that text a bit.
Locations
1. Photograph the Northern Lights
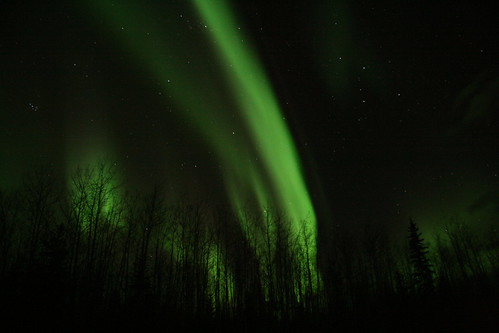
Northern Lights_253 by ru_24_real (flickr.com)
This is very high up my list of things I want to photograph. I’ve always been fascinated by the amazing colours and patterns of the Aurora Borealis. Some of my favourite photos are of this natural phenomenon.
2. Photograph the Grand Canyon
Great patterns, great texture, great light. What’s not to love?
3. Go to Yosemite, home of Ansel Adams

El Capitan Yosemite National Park, by Jim's Outside Photos (flickr.com)
I can take or leave a lot of the ‘famous’ photographers, but I love a real master like Ansel Adams. A lot of his best work was taken in Yosemite, and I think it’s pretty much a compulsory pilgrimage for landscape photographers. I’d probably have to try and re-create some of his more famous works, then be depressed when they inevitably pale in comparison
4. Photograph from Space
OK, I realise this one is probing the edges of reason, but as space tourism takes off, there’s got to be some kind of chance it’ll be reasonably affordable during my lifetime! Surely this would be the ultimate landscape photography destination.
5. Photograph the Icazu Falls
These waterfalls are incredibly impressive. They’re so big that it would hopefully be possible to get some original shots, unlike most waterfalls
6. Photograph Antelope Canyon
Some of the most spectacular photos I’ve ever seen have come from here. The light is amazing.

Upper Antelope Canyon - by Mandj98 (flickr.com)
7 Take photos at Glendalough
Images of this place were some of the first that inspired me to get in to photography. It’s serene, there are lakes, and there are mountains. A landscape photographer’s dream come true.
8. Take photos at the Giant’s Causeway
Another place I have seen many incredible photos. It’s just so far away...
9. Do a long exposure with people at the Iron Man in UL
This won’t mean anything to most people, but every time I pass this statue I think to my self that it would be cool to do a long exposure of, with the statue not moving and surrounded by blurry people. Someday I’ll do it.
10. Go to Prague and take photos
Fascinating historical architecture, beautiful winters, famous bridges.
11. Go to New York and take photos
Crazy people, crowded streets, non-stop action, fascinating architecture, huge buildings. Oh, and some of the best photo stores on the planet. That enough?
12. Go to Bombay to take photos
Any big city in India, really. The colour and energy of these places fascinates me.
13. Venice
More history than you can shake a stick at, lots of water, and lots of fog.
14. Take photos of New England in Autumn
Gotta love those colours...
15. Go on Safari
This is another one high up the list of photography destinations, for almost any photographer. I think it’s pretty obvious why. I’d love to get some stunning black and white photos of wild animals, like these.
16. Spend a day in a hide
Not something I really have the patience for, but it would be a great experience to try it once.
17. Go to Fota Island Zoo
I’ve been here before, as has pretty much every kid in the South of Ireland. I’d like to go back with a camera. It’s slightly more open than most zoos – should be good for photography.
Techniques
18. Do more drop/splashes, using the lighting I used for the smoke photos.
I’ve taken some photos of drops and splashes using off-camera lighting, but I always had difficulty darkening the background enough. Using a snoot to direct a narrow beam of light through the drop, as I did with these smoke photos, should produce better results.
19. Get good photos of star trails, with the northern star in the middle
This is something I’ve been trying to do since I took up photography, but never succeeded. It’s always too cloudy, or there’s too much ambient light, and my only wide-angle lens doesn’t have any infinity mark on it – stupid cheap kit lens... I really want to get a good photo of star trails, with the northern star in the middle of at least in the frame, and the trails making circles around it.
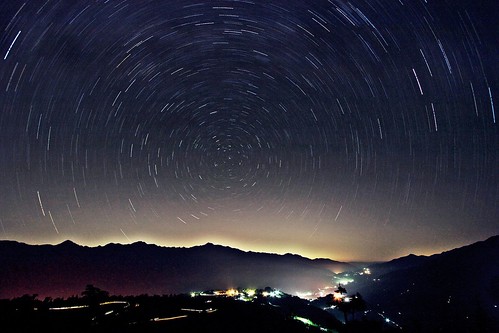
Star Trails @ Fusoshan by Fishtail@Taipei (flickr.com)
20. Get one nice street shot or environmental portrait
This isn’t something I ‘m good at, but I’d love to take a good classic black and white street shot, or maybe a wide-angle environmental portrait of some interesting subject. I’ll never be Cartier-Bression, but I’d like to try every technique at least once.
21. Use off camera lights to get that cool film noir effect.
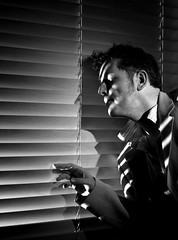
Come and get me coppers, by intsjustanalias (flickr.com)
Been meaning to try this for a long time, if only because it’s quite simple.
1. Shoot hard light through window blind at person wearing a hat.
2. ???
3. Profit.
22. Make a good time-lapse film
I’ve tried this, and like most things I try, it’s harder than I thought. I’d love to do a whole day, from sunrise to sunset. My main problem is finding somewhere interesting I can leave a camera for a whole day!
23. Make just one decent HDR image
Mine all looked over-cooked. How do you do it properly? Evidently half of The Internet doesn’t know either. There’s a lot of truly awful HDR imagery around. But when it’s done right, it can look spectacular.
24. Take one of those long exposure in a moving car at night photos
I think everybody has to do it at least once; it’s a law or something.

through the tollbooth....again, by Ben Mcleod (flickr.com)
25. Take photos through a microscope
I’d love to try this just once – I don’t think it would hold much interest for me in the long term. I’m always extremely impressed by the Nikon competition that happens every year though.
26. Take photos while scuba-diving
This is something I imagine takes a lot of gear in order to get results that are anything but awful. The combination of terrible light and sticking some thick waterproof plastic over your camera and lens can’t be good. If I ever do this I’ll need to rent some gear.
27. Learn how to use Photoshop
I know Lightroom inside-out, but I’ve never gone near Photoshop. I downloaded the trial and felt a bit ill – there are way too many buttons. However, in this digital age, it is an essential skill.
28. Get a great photo using just rim lighting
Just one light, and a black background. Just enough light to get the outline of a person or thing. Here's another cool example:

Frame Work, by Auzigog (flickr.com)
29. Spend a day with a fixed lens
Everyone says this, but I’ve never tried it. Shooting with a fixed lens makes you much more careful about composition. You can always zoom with your feet.
30. Get some great pictures in the fog and trees
This one is filed under ‘I’ve tried and failed’. I love good fog photos – the sense of mystery and the minimalism.
31. Make a very long exposure photo of the sea at night
I’ve seen some very cool shots like this, particularly at Photoblog 2.0
32. Photograph a fireworks display
The web is swarming with ‘how to photograph fireworks’ tutorials for some reason, and I think I’ve read just about all of them. Someday I’ll actually have to put this knowledge to practice.
33. Make a short film
There’s always been a strong link between photography and moving film, and with the ability to shoot video on the new Nikon D90 and the Canon 5D Mk II, the two disciplines are going to be closer entwined than ever before. I’d love to give it a go. The thing that has always put me off trying a digital camcorder is the huge depth of field: everything is in focus, severely limiting creative effects. With these two cameras, with their huge control over depth of field and manual focus, digital video just got much more appealing to somebody like me, who values the aesthetic of film as much as the narrative.
34. Do one of those transparent computer screen things
You know, like here. Cool eh?
35. Make a large print and frame one of my photos
Apparently making high-quality prints from digital images is an art unto itself. Also, it would be nice to actually have physical print of something I’ve taken. Everything I do is in ones and zeros.
People
36. Photograph a new-born baby
Black and white, on a black background. It’s a cliché, but it works.
37. Shoot a gig with a fish-eye lens
I’ve done some gig photography, and enjoyed, but it looks a bit ‘samey’. The best stuff I’ve seen has been through a fish-eye lens, extremely close up. I’d love to give it a try (and try not to get killed by the band at the same time)
38. Do a portrait session with a band
You know, the train tracks, walking across the road, all that highly original stuff... Really though, there’s a lot of room to experiment and be creative taking portraits of bands. And hopefully they’ll become rich and I can sell all my photos for lots of money...
39. Spend a day in a kitchen, or some other high-energy workplace.
This would be fun. I’ve worked in kitchens in restaurants, in the highly prestigious position of wash-up man. A kitchen is home to a huge range of emotion, from hilarity to rage, and swings from one extreme to another, many times in a single night. I’d love to try to depict this through photography.
40. Photograph a wedding
OK, so risking the most important day of somebody’s life just so I can say I’ve done a wedding might be a little selfish, but I’d really love to try this one day, at least as a second shooter. It’s a great mix of professionalism, high-adrenaline, and artistry.
41. Get a photo of an ‘interesting’ face

face - old man, by china.sixty4 (flickr.com)
You know, one of those wrinkly people whose face ‘tells a thousand stories’.
Gear
42. Buy a Sigma 10-20mm or other wide-angle lens
I’ve been ogling the Sigma 10-20 for about a year and a half. I love landscape photography, but I really want to get wider. I really think an ultra-wide-angle lens would push my landscapes to the next level.
43. Buy umbrellas, light stands and adapters and finally learn how to off-camera light properly
Another thing I’ve been meaning to get for a long time. It doesn’t take much of an investment, and it’s well worth it. I’ve been reading Stobist for the past year or so, and I’ve been inspired to try my hand at off-camera lighting. I’ve had a certain amount of success using bare flash and some DIY modifiers, but it’s never really been completely satisfying.
44. Borrow a Leica for a couple of days
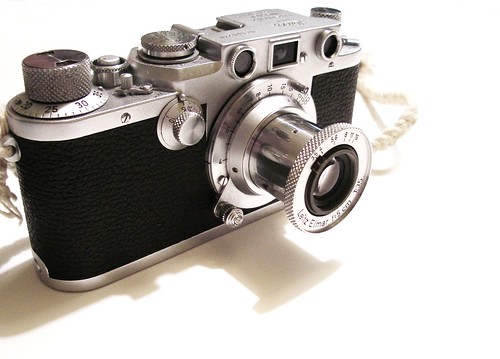
Leica IIIf, by selva (flickr.com)
I’ve already said that I’ll never be Cartier-Bression, but borrowing a Leica (preferably an old film one) and swanning around town for a few days is probably the closest I’ll ever get. I would love to try out this legendary camera.
45. Get a graphics tablet
If I finally learn to use photoshop, or even just upgrade to Lightroom 2.0, one of these would hugely improve the speed and accuracy with which I could do things like dodging and burning.
46. Rent a studio and a hire a model for a day.
Another thing I’d love to try out at least once – see what I can produce with professional equipment and professional people.
47. Build a studio in my garage
Nothing fancy – just get some umbrellas and light stands, and a couple of backdrops. It’s amazing what can be done with very little money.
Learning & Improving
48. Make a photo essay
I’d love to do this – come up with an idea, take a load of photos with the intention of telling a story rather than just for their own sake.
49. Win a competition
Preferably one with more than one entrant. I enter competitions now and again, never with much success. The closest I’ve come was being shortlisted for the World Photography Awards last year, and that gave me a boost that lasted for months. If I actually won something I’d probably explode.
50. Write something about history and photography
I’m doing an M.A. in History – it’s my primary interest. There is a huge area of study around the history of photography, and also history as seen through photography. I’ve never really looked into it, but I’d like to.
51. Teach a class
I think that one of the best ways to learn is by teaching. I’m not an expert in anything, but I know I’d learn a lot merely by organising and planning a class. It’d feel good to give something back, too.
52. Read a fancy photography book
Perhaps On Photography, by Susan Sonntag. I really enjoy photography, but I’d love to learn more about the theory behind it.
53. Get a photo to number 1 in explore on Flickr
This wouldn’t be a particularly big compliment on my photography, judging by the some of the stuff that makes it to the top on Flickr. It would be kind of exciting though!
54. Sell a photo
Just one. For MILLIONS preferably...
55. Get paid to photograph something.
Different from selling a photo. I would really like to be commissioned to do some kind of photography job. Wouldn’t have to be fancy: Maybe taking photos of a house for an estate agents, a product for ebay, or even a family portrait. Doing something for money really focuses the mind – this would undoubtedly make me a better photographer.
56. Buy a fine-art print from an up-and –coming photographer
It’s great to support other photographers, even if you don’t intend on making a living from it yourself. Also buying something, with the intention of displaying it, really clarifies the mind on what one actually likes. There’s a big difference between admiring a photo on the net or in a gallery, and being able to put up with it every day.
So, there you go. Hopefully this will be of interest to somebody - you might even get some ideas. If I do any of these, I might start crossing them off, and posting about my results on the blog.


